How To Install A Bed Rack

Installing a bed rack is one of the simplest upgrades you can make to a truck — and one of the most impactful. Most bed racks go from box to bolted-down in under an hour, many require zero drilling, and the only tools you'll need are things already sitting in your garage. Yet it's also where we get the most phone calls. Not because installation is hard, but because the process differs depending on the mounting method your rack uses.
A stake pocket rack installs differently than a clamp-on system. A T-slot compatible bed bar mounts to your tonneau cover's rails instead of the truck's bed rails. A drill-through rack needs prep work that bolt-on designs don't. This guide covers all four mounting methods step by step, the tools you'll need for each, how to avoid the mistakes we see most often, and what to check after your first drive to make sure everything stays tight.
📞 Need installation help? Call us at 844-200-3979. We'll walk you through the install for whichever rack you bought — from us or from anyone else.
Before You Start: What You Need to Know
Before you unbox anything, take ten minutes to do three things that will save you time and frustration during the actual install.
1. Read Your Rack's Manual First
Every bed rack brand has slightly different hardware, bracket designs, and torque specs. We know — reading the manual isn't exciting. But skipping it is how people strip bolts, install brackets backwards, or discover halfway through that they're missing a spacer. Pull up the PDF (most brands host it on their product page) and scan it end to end before touching any hardware. If your rack didn't include a manual, check the manufacturer's website or call us — we can send you the instructions for any rack we carry.
2. Measure Your Truck Bed
Confirm three measurements before installation: the width between your bed rails (inside edge to inside edge), the distance between your stake pockets (front to rear), and the bed length. Most bed racks are adjustable within a range, but knowing your exact dimensions tells you where to set the width adjustment before you start tightening. This is especially important for universal racks like the RCI 12" HD, which adjusts from 54" to 64" to fit different trucks.
3. Gather Your Tools
The majority of bed rack installs require nothing beyond basic hand tools. Here's what you'll want on hand:
Standard Bed Rack Installation Tool Kit:
Socket wrench set — 10mm, 13mm, 14mm, 17mm cover most racks (metric is standard for nearly every bed rack brand)
Allen key / hex set — 5/32", 7/32", 5mm, 6mm (Billie Bars and Leitner both use hex bolts)
Torque wrench — essential if your manual specifies torque values (most do, typically 20–25 ft-lbs)
Tape measure — for centering the rack on the bed and verifying bracket spacing
Painter's tape or masking tape — for marking positions and protecting paint
Drill + drill bits — only if your specific rack requires drilling (most don't)
A second person — not strictly a tool, but some rack frames are heavy and awkward to position alone
The Four Bed Rack Mounting Methods
Every bed rack on the market uses one of four mounting systems. The method your rack uses determines the installation process, how secure it is on rough terrain, and whether you need to modify your truck. Here's how each one works and what the install looks like.
| Mounting Method | Drilling Required? | Install Time | Best For | Brands That Use It |
|---|---|---|---|---|
| Stake Pocket / Bed Rail Clamp | No | 30–60 min | Most trucks, easiest install | RCI, CBI, Cali Raised, Tuff Stuff |
| Bed Channel / Track Mount | No | 30–45 min | Trucks with factory utility tracks | Leitner ACS, some CBI models |
| T-Slot Tonneau Rail Mount | No | 20–45 min | Trucks with retractable tonneau covers | Billie Bars, Leitner ACS Tonneau, Front Runner |
| Drill-Through / Bolt-Through | Yes | 60–90 min | Maximum stability for heavy loads / off-road | UpTop Overland, some Front Runner kits, RCI (optional) |
Method 1: Stake Pocket & Bed Rail Clamp Installation
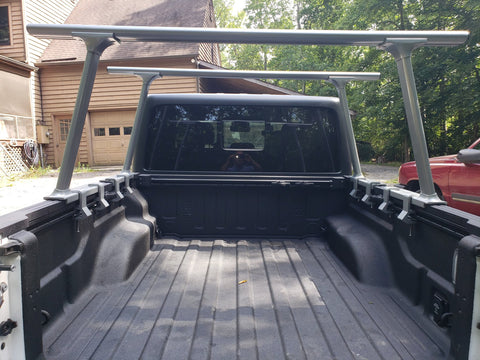
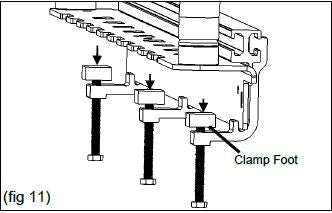
This is the most common mounting method and the one most people are working with. The rack's legs or brackets drop into your truck's stake pockets (the rectangular holes along the top of the bed rail) or clamp onto the bed rail itself with C-clamps or U-bolts. No drilling. No permanent modification. If you ever want to remove the rack, you unbolt it and your bed looks factory.
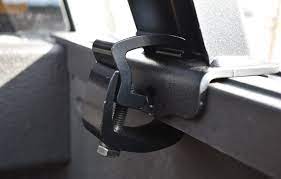
RCI bed rack — C-clamp mounting onto truck bed rail
Thule TracRac — channel clamp mounting system

RCI clamp hardware detail — bolts grip the inside of the bed rail
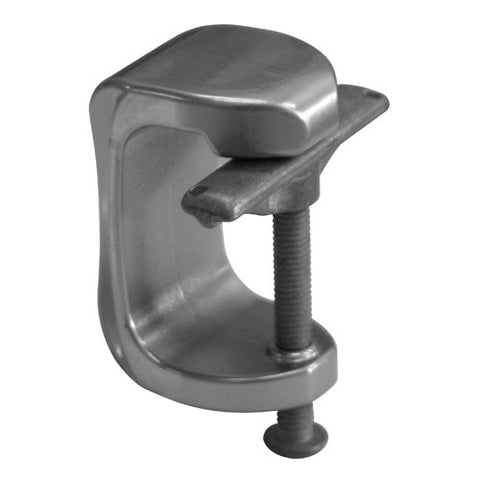
Thule TracRac clamp detail — slides into the bed's channel
Step 1: Lay out all hardware. Unbox everything and organize the parts according to your manual. Confirm you have all bolts, brackets, spacers, and crossbars. Missing a single spacer can throw off the entire install — and it's easier to call for a replacement now than halfway through.
Step 2: Assemble the rack frame. Most racks ship partially disassembled. Connect the crossbars to the uprights or side rails loosely — hand-tight only. You'll need adjustment room when you position the rack on the bed.
Step 3: Position the brackets in the stake pockets. Remove your truck's factory stake pocket covers if you have them (they usually pop off with a flathead screwdriver or by hand). Drop the rack's mounting blocks or feet into the stake pockets. For clamp-on designs, position the C-clamps over the bed rail and thread the bolts finger-tight.
Step 4: Center and level the rack. This is the step most people rush and regret. Use a tape measure to verify the rack is centered side to side — equal distance from each bed rail to the nearest crossbar. Check that the front and rear crossbars are parallel to each other and perpendicular to the bed rails. If your rack is off-center even slightly, the load distribution will be uneven, and you'll hear rattling on the road.
Step 5: Tighten all hardware to spec. Once centered and level, work through every bolt in a consistent pattern — front left, front right, rear left, rear right — tightening in stages rather than fully torquing one bolt before moving to the next. If your manual specifies torque values (typically 20–25 ft-lbs for most bed racks), use a torque wrench. Over-tightening can crush bed rail caps or strip bolt holes. Under-tightening lets the rack shift.
Step 6: Check for movement. Grab the rack and try to rock it side to side and front to back. There should be zero lateral movement. If it shifts, re-check your bolts and bracket positioning. A properly installed clamp-on bed rack should feel like part of the truck.
Method 2: Bed Channel / Factory Track Installation
Some trucks — including many Toyota Tacoma models, the Jeep Gladiator, and newer RAM trucks — come with factory utility tracks (also called bed channels or trail rails) built into the bed floor or bed rail caps. These are T-shaped or L-shaped aluminum channels designed to accept aftermarket accessories. The Leitner ACS Forged and ACS Classic mount directly into these channels.
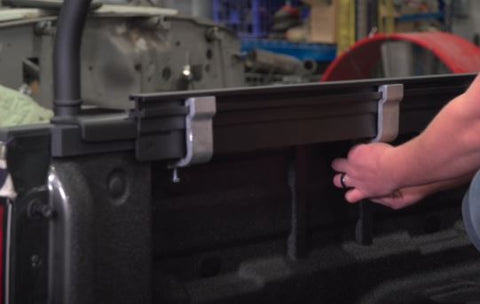
Leitner ACS — bracket slides into the factory bed track
Leitner ACS — channel mount hardware locks into position
Step 1: Clean the factory tracks. Dirt, gravel, and debris accumulate in these channels quickly. Use compressed air or a brush to clear them out. A clogged track prevents the mounting bolts from seating properly.
Step 2: Slide the rack's mounting brackets into the tracks. Each bracket has a bolt or T-nut that drops into the channel and locks in place when tightened. Slide them to the approximate position shown in your manual, but leave them loose enough to adjust.
Step 3: Set the crossbar spacing. For racks like the Leitner ACS, the rear crossbar is designed to slide along the full length of the bed. Position the front crossbar near the cab and the rear crossbar where it gives you the best balance between cargo capacity and bed access. If you're mounting a roof top tent, the manufacturer's instructions will usually specify the recommended crossbar spacing.
Step 4: Tighten and verify. Same as Method 1 — tighten in a cross pattern, check centering, torque to spec. The Gladiator's Mopar trail rail system uses metric bolts (typically 13mm), while Toyota's utility track system varies by generation.
Gladiator Tip: If your Jeep Gladiator didn't come with the factory trail rail system, you can purchase it separately from Mopar and install it first. Once the rails are in, bed rack installation is bolt-on and drill-free.
Method 3: T-Slot Tonneau Rail Installation
If you're running a retractable tonneau cover with T-slot rails — Retrax XR, Pace Edwards UltraGroove, or Roll-N-Lock — you can install a bed rack directly into those rails without touching your truck's bed rails at all. This is the fastest and cleanest install method available, and it's how every Billie Bars T-Slot kit, Leitner ACS Forged Tonneau, and Front Runner Slimline II Retrax kit mounts.
Step 1: Locate the T-slot channels on your tonneau cover's side rails. These are the continuous grooves running along the inside edge of each rail. They accept standard T-bolts.
Step 2: Insert the rack's mounting brackets. Slide the T-bolt heads into the channel from the open end of the rail. Position the brackets at the spacing recommended in your manual.
Step 3: Mount the crossbars and tighten. Set the crossbars onto the brackets, hand-tighten all bolts, verify spacing and centering, then torque to spec. For Billie Bars, the recommended torque is 20–25 ft-lbs. Do not over-torque — the tonneau cover's aluminum rails can strip if you exceed the specified value.
The entire process takes 20–45 minutes depending on the rack. No drilling. No modification to the truck or the cover. If you want a detailed breakdown of which tonneau covers and racks pair together, see our bed rack with tonneau cover compatibility guide.
Method 4: Drill-Through / Bolt-Through Installation
Drill-through mounting provides the most secure connection between the rack and your truck bed. Instead of clamping or sitting in pockets, the rack's brackets bolt directly through the bed floor or bed rail with fasteners. This is the method you'll see on heavy-duty commercial racks and overland builds designed for sustained off-road abuse where maximum rigidity matters.
UpTop Overland AFS Truss — drill-through mounting bracket

AFS Truss bolt hardware — these bolt through the truck bed floor
The tradeoff is obvious: you're putting holes in your truck bed. That's permanent. If you remove the rack later, you'll have bolt holes to deal with. For many overlanders who plan to keep their rack on permanently, this isn't a concern. But it's worth considering if you lease your truck or plan to sell it stock.
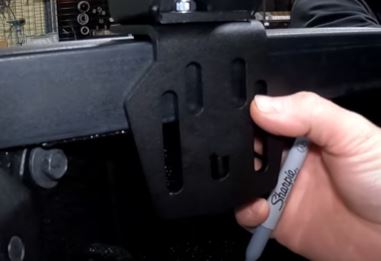
Step 1: Position the rack on the bed and mark drill locations. Set the assembled rack (or at least the mounting brackets) in their final position. Use painter's tape on the bed around each bracket, then mark the center of each bolt hole with a punch or marker. Remove the rack.
Step 2: Drill pilot holes. Start with a small pilot bit (1/8") to create guide holes at each mark. Then step up to the final bolt diameter specified in your manual (usually 3/8" or 10mm). Drill slowly and use cutting oil to keep the bit cool and prevent burring. Clean up any metal shavings immediately.
Step 3: Treat the holes. This step is critical and frequently skipped. Bare metal exposed by drilling will rust. Apply a rust-preventative primer, touch-up paint, or rubbing compound to every drilled hole before bolting the rack down. Some installers also apply a thin bead of silicone sealant around each hole to prevent water from seeping into the bed structure below.
Step 4: Bolt the rack down. Use the provided hardware — typically stainless steel bolts with lock washers or nylon lock nuts — to secure the rack from the top. Reach under the bed to add washers and nuts on the underside. Tighten in a cross pattern and torque to spec. Check that no bolts interfere with bed wiring, brake lines, or fuel lines underneath.
Before You Drill: Look under your truck bed before marking any drill locations. Brake lines, fuel lines, and wiring harnesses can run along the underside of the bed floor. Drilling into one of these is dangerous and expensive. Take the time to check from below with a flashlight — it takes thirty seconds.
After Installation: The First-Drive Checklist
Your rack is on. It looks great. You're ready to load it up and hit the road. But before you do, one more step makes the difference between a rattle-free install and a headache-inducing one.
Drive 50–100 miles, then re-check every bolt. This isn't optional — it's recommended by nearly every rack manufacturer. Vibration from normal driving causes hardware to settle during the first few drives. Bolts that were torqued to spec during installation can loosen slightly as brackets seat into their final position. After your first highway run or trail session, go through every bolt and retorque to the original spec.
After that initial check, we recommend inspecting your bed rack hardware every 500 miles or before any extended off-road trip. It takes five minutes with a socket wrench and can prevent a much bigger problem down the road.
Post-Install Checklist:
✔ All bolts torqued to manufacturer spec
✔ Rack centered — equal distance from both bed rails
✔ Zero lateral movement when rocking the rack by hand
✔ No contact between rack hardware and bed wiring/lines underneath
✔ Stake pocket covers stored (you'll want them if you ever remove the rack)
✔ Re-check after first 50–100 miles of driving
✔ Re-check every 500 miles or before off-road trips
Common Installation Mistakes (and How to Avoid Them)
Over-Tightening Bolts
This is the number one mistake we see. Truck owners crank bolts as tight as they can, thinking tighter means more secure. In reality, over-torquing crushes bed rail caps, cracks plastic stake pocket covers, strips aluminum T-slot threads, and can warp the rack's brackets. If your manual says 20–25 ft-lbs, that's the spec. Use a torque wrench. If you don't own one, borrow one — it's that important.
Skipping the Centering Step
An off-center rack creates uneven load distribution. On the highway, this causes wind noise on one side. On the trail, it puts unequal stress on your bed rails. Take the extra two minutes to measure from each bed rail to the rack's nearest crossbar. They should be identical.
Installing the Rack Solo When It Needs Two People
Bed bars from Billie Bars weigh under 50 lbs — those are a solo install. A full Leitner ACS Forged rack or a Front Runner Slimline II platform is heavier and awkward to position alone. If you try to muscle a 70+ lb rack frame onto your bed by yourself, you risk dropping it on your paint, misaligning the brackets, or hurting your back. Have a buddy hold one end while you position the other.
Forgetting to Treat Drill Holes
If you drilled through the bed floor, raw exposed metal will rust. Period. Apply primer, paint, or sealant to every drilled hole before you bolt the rack down. Ten minutes of prep prevents corrosion that could compromise the bed's structural integrity over time.
Not Verifying Tonneau Cover Compatibility Before Installing
We've had customers install a bed rack and then discover their tonneau cover no longer closes. If you're running a cover — or plan to add one later — verify compatibility before you bolt anything down. Our tonneau cover compatibility guide covers which racks work with which covers.
Frequently Asked Questions
Do I need to drill to install a bed rack?
In most cases, no. The majority of bed racks we sell — including Billie Bars, Leitner ACS, RCI (with clamp option), and CBI — mount using stake pocket brackets, bed rail clamps, factory track channels, or T-slot tonneau rails. None of these require drilling. Drill-through mounting is only necessary for certain racks like the UpTop Overland TRUSS or when you choose the bolt-through option on racks like the RCI for maximum rigidity on extreme off-road builds.
How long does it take to install a bed rack?
Most bolt-on or clamp-on bed racks install in 30–60 minutes. T-slot tonneau rail installs (like Billie Bars) are faster — typically 20–45 minutes. Drill-through installs take longer, usually 60–90 minutes, because you need to mark, drill, treat the holes, and then mount. Add another 15–20 minutes if this is your first bed rack install and you're reading instructions as you go.
Can I install a bed rack by myself?
For lightweight bed bars like Billie Bars (under 50 lbs), absolutely — it's a one-person job. For heavier full-height racks from Leitner, Front Runner, or CBI (60–85+ lbs), we strongly recommend having a second person to help lift and position the frame. The installation itself isn't complex, but holding an 80 lb rack frame in position while threading bolts is awkward alone.
What torque spec should I use for bed rack bolts?
Always follow your specific rack's manual. As a general reference, most bed rack manufacturers specify 20–25 ft-lbs for mounting bolts. Billie Bars recommends 20–25 ft-lbs. Leitner specifies torque values in their ACS manual. Over-tightening is more dangerous than under-tightening — you can always retorque, but you can't un-strip a thread.
Will a bed rack damage my truck's paint or bed liner?
A properly installed bed rack should not damage paint or bed liner. Most quality racks include rubber pads, foam gaskets, or protective spacers at every contact point between the rack and the truck. If yours doesn't, add adhesive rubber pads yourself before tightening — a sheet of rubber gasket material from any auto parts store works perfectly and costs a few dollars.
Related Guides
📖 Bed Rack Guide 2026
Types, brands, vehicle fitment, pricing — the complete bed rack buying guide.
📖 Bed Rack With Tonneau Cover
Find out which bed racks work with which tonneau covers — T-slot, tri-fold, and more.
📖 Bed Rack vs Roof Rack
Not sure whether a bed rack or roof rack is right for your setup? We compare both.
📖 Shop All Bed Racks
Browse bed racks by brand, vehicle, height, and price — all with free shipping.
Ready to Install Your Bed Rack?
We carry bed racks from Billie Bars, Leitner, RCI, CBI, Front Runner, Cali Raised, and more — all with free shipping. If you need help choosing the right rack for your truck, we're a phone call away.
Shop Bed Racks📞 844-200-3979 | Free Shipping | Expert Fitment Advice